Distill and Github Pages Setup
A walkthrough of setting up a new Distill site on GitHub Pages
NOTE: Since this article was written, we have migrated from Distill to Quarto. We’ll leave this here in case it’s still helpful to anyone, but it’s not how the site is currently built.
This document contains a walkthrough of setting up a new Distill blog using RStudio and GitHub pages. It’s the first in a series of articles for social scientists showing how to create, publish and update a website using these packages. This is a relatively easy way to set up a lightweight website that’s well-suited for blogging and writing articles, especially about and using R. Once it’s built, you maintain it using RStudio just like your other projects.
Although it’s intended to be complete, and not overly technical where avoidable, it does assume a modest level of comfort using basic tools like RStudio and GitHub. If you’re on Mac or Linux, you probably have git built in already, but you might need to install it if you’re on Windows. That’s outside the scope of this article, but you can find information about it on the Git for Windows download page.
The very high-level overview of the process here is:
- Create a new, empty GitHub repository that will contain your site
- Create a new, empty RStudio project using the repository you just created
- Install the Distill framework into this project
- Configure and build the bare-bones, empty site and push it up to GitHub
- Configure GitHub Pages to publish the site
Once you’ve done that, you can begin writing content and publishing blogs, and spend time fine-tuning and tweaking your site. (You can also do that before setting up GitHub Pages if you want to wait to unveil it until it has more content and polish - as you prefer.)
Assuming you have git and RStudio installed, and a GitHub account created, you’re ready to proceed!
Create new GitHub repository
The first step is to create a new repository for the site. Log into GitHub and create a new repo:
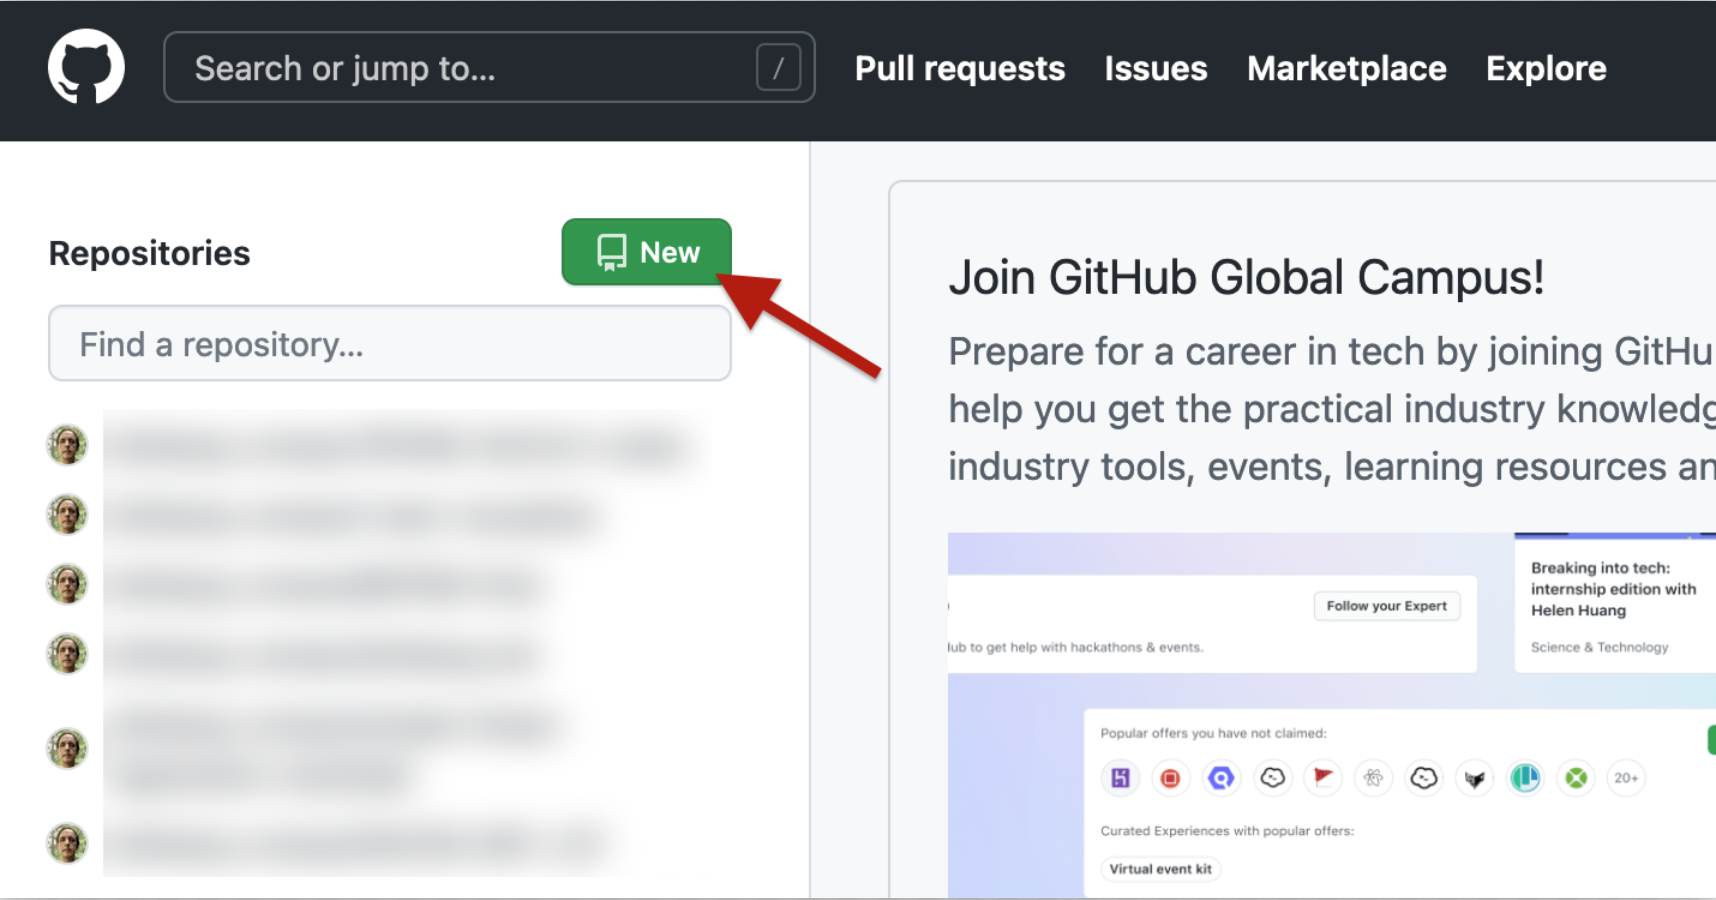
Call it something sensible like “distill-blog”; make it public (unless you don’t want to) and add a .gitignore file using the R template (just to start things off). Also, if you haven’t already, change your github repository settings to use “main” as your default branch name instead of “master”.
We’ll come back in a bit to set up the Pages part, but for now we just want to get the project built and populated. We now have an empty Git repository sitting on GitHub, waiting to be used for something.
Create a new RStudio project using the repository
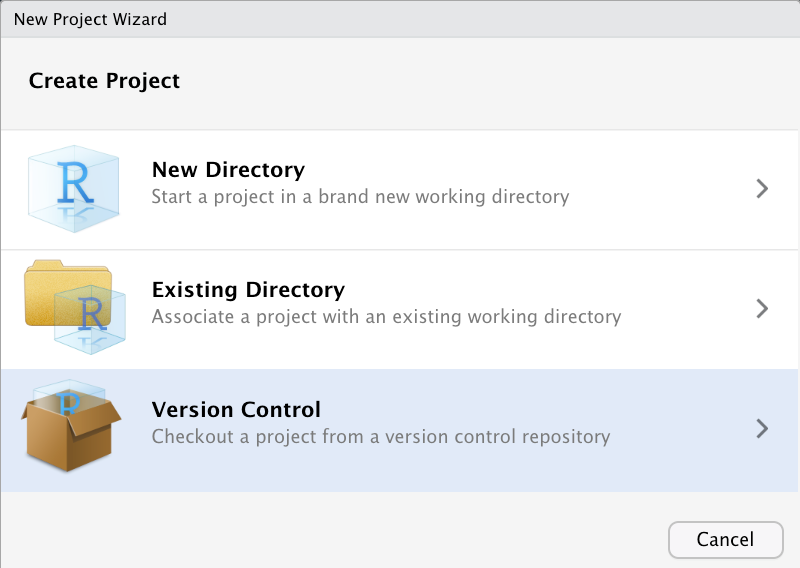
Now we’ll use our new, empty GitHub repository for our Distill blog. From RStudio, choose “File -> New Project” and choose “Version Control”:
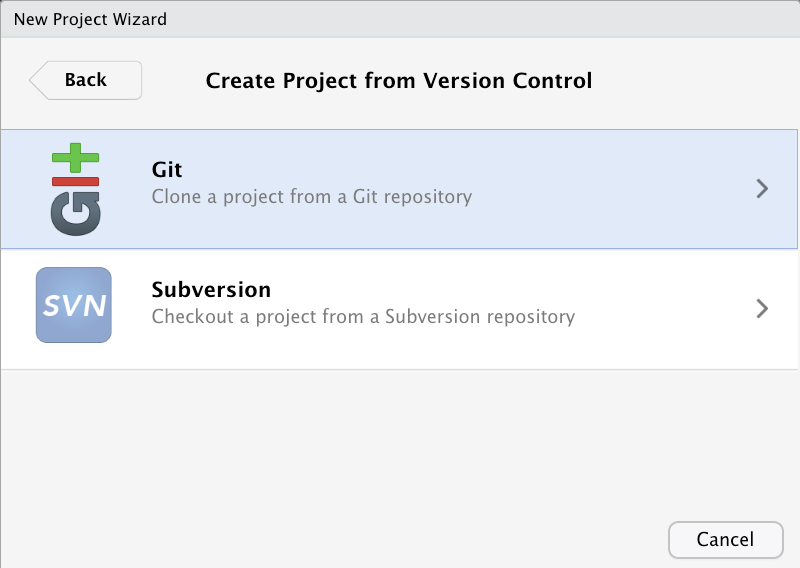
Choose “Git”:
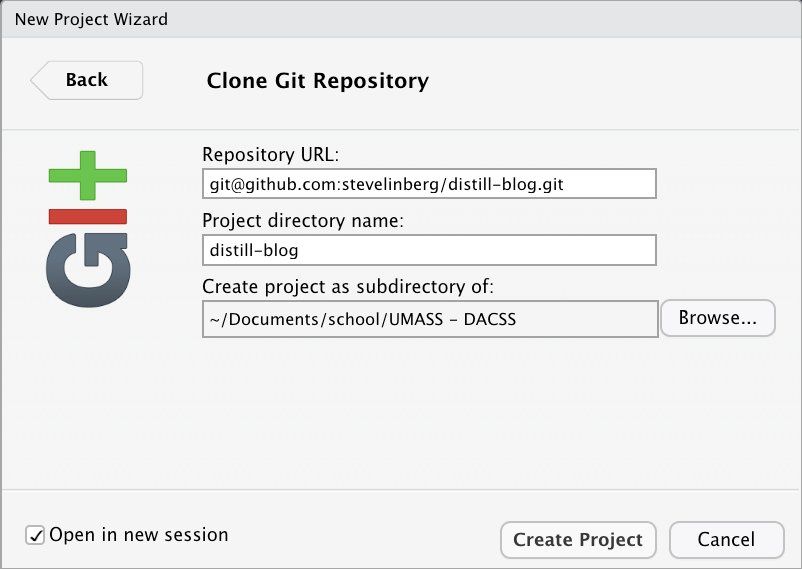
Copy in the repository URL from your project (found as shown below):
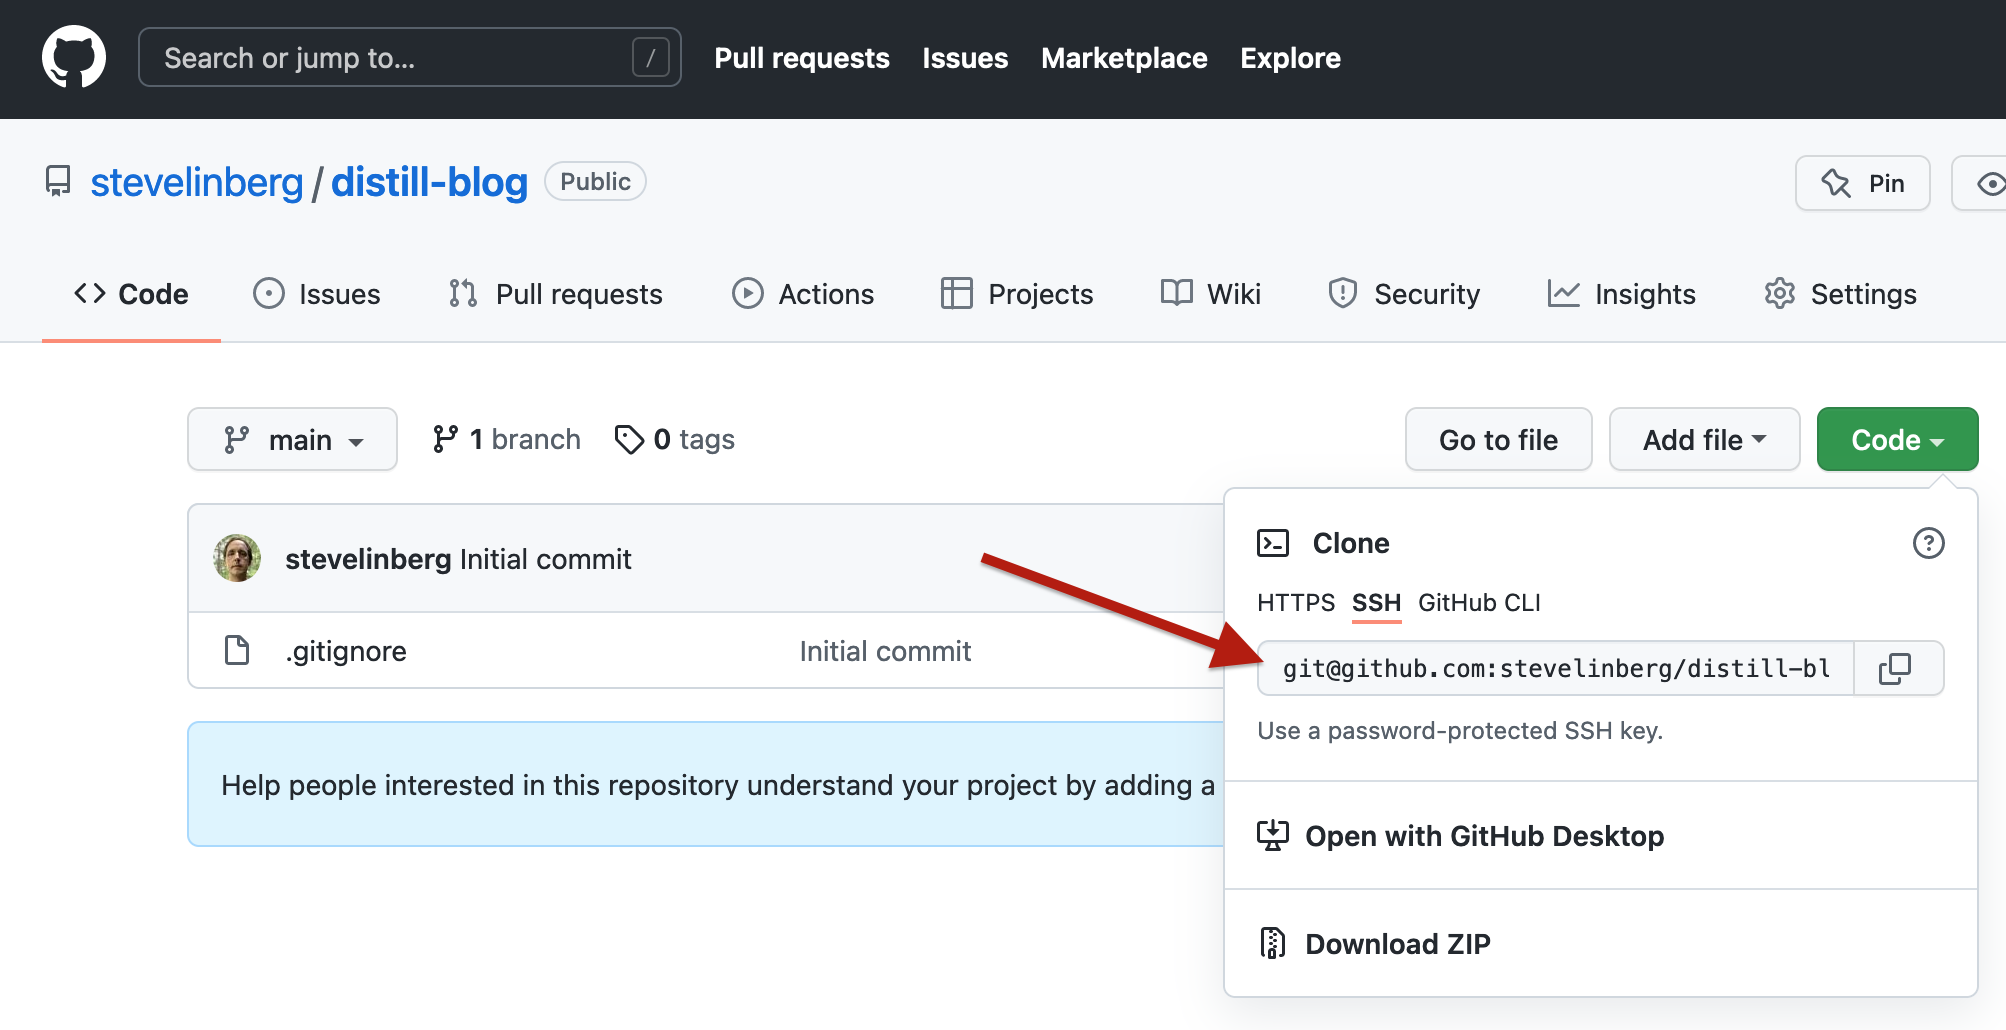
Paste it into the Repository URL field in the wizard, choose where you want to store it on your computer, and I recommend checking Open in new session for a clean slate. Click “Create Project” to create it.
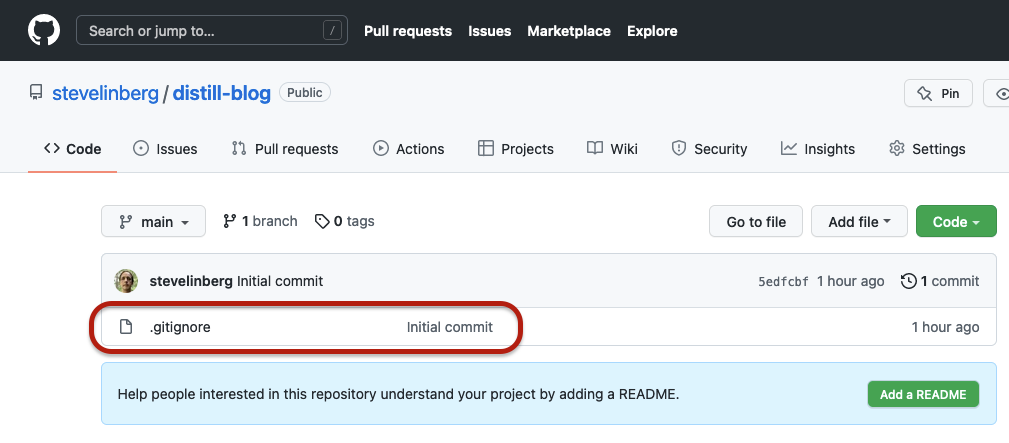
The empty project will open in a new RStudio window. RStudio has added 3 new files (actually three directories) to the skeleton created by Github, which initially only contains the skeleton .gitignore file:
RStudio adds the .git directory, the .Rproj.user directory, and the distill-blog.Rproj RStudio project file (it will be named with the “Project directory name” field from the final screen of the New Project Wizard).
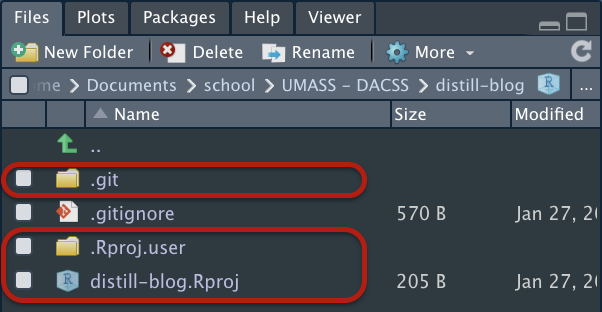
The .gitignore file created by Github tells git to ignore the .Rproj.user directory (which contains local settings used by RStudio and which you don’t need to (and shouldn’t) share or publish), and the .git directory is part of every repository and contains the repository settings.
We want to keep github and RStudio in sync, generally speaking. More precisely, we want to keep the repository in sync between GitHub and RStudio. The local git repository doesn’t yet know about the project file distill-blog.Rproj, since RStudio added that after cloning the repository from GitHub, so a good first task is to add it to the local repository, and push it back up to GitHub to get it in sync, and make sure that that core pipeline is working, since we’ll be using it constantly.
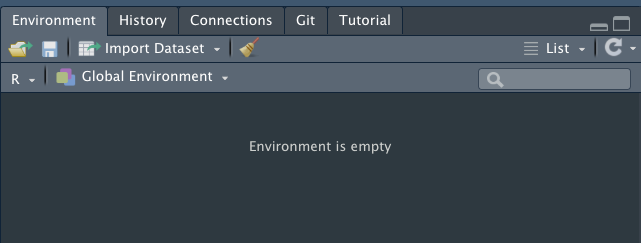
Although there is a “Git” pane in the Environments panel, which shows that distill-blog.Rproj is ready for staging:
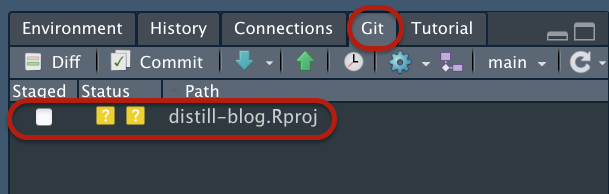
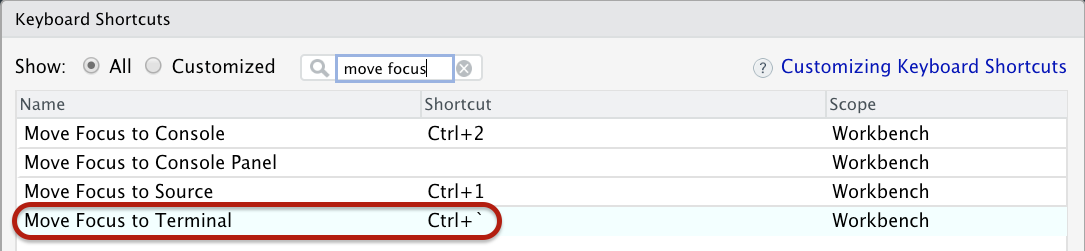
…I am an old-school curmudgeon and prefer to use the terminal for git commands, since not everything I normally do with git has a representation in this visual UI. In RStudio I have even remapped the shortcut control-backtick to the terminal for quick switching:
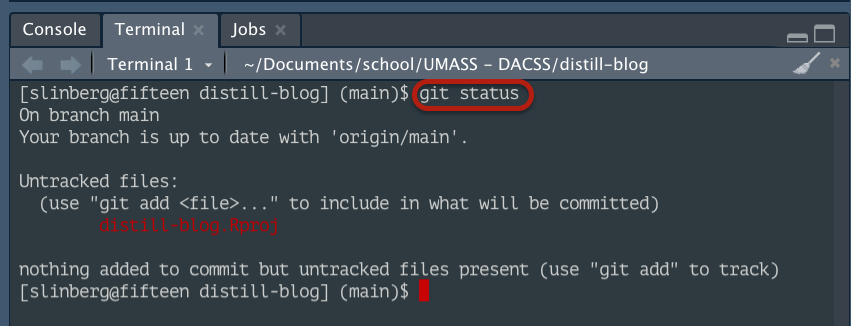
Within the terminal, typing git status will show that git doesn’t yet know about distill-blog.Rproj:
This isn’t going to be a git tutorial, so we’re just going to add the file to the repo and push it back to github. If you get stuck in this process, pause here until you’re able to troubleshoot and continue.
The git commands to update the repository with are:
git add .
git commit -m "Add RStudio project skeleton"
git push
(Note: the first command, git add ., says to add all files in the current directory to the repository. We could have explicitly typed git add distill-blog.Rproj, but (a) git add . is much faster, and (b) much easier in the steps below when we may not even know all of the files that need adding, and explicitly enumerating them could be troublesome and error-prone. Sometimes you want to be careful and specific about which files you’re staging, but that’s beyond the scope of this discussion, and we’re keeping it simple here.)
[slinbergdistill-blog] (main)$ git add .
[slinbergdistill-blog] (main +)$ git commit -m "Add RStudio project skeleton"
[main 6c67d2d] Add RStudio project skeleton
1 file changed, 13 insertions(+)
create mode 100644 distill-blog.Rproj
[slinbergdistill-blog] (main)$ git push
Enter passphrase for key '/Users/slinberg/.ssh/sfl_id_rsa':
Enumerating objects: 4, done.
Counting objects: 100% (4/4), done.
Delta compression using up to 8 threads
Compressing objects: 100% (3/3), done.
Writing objects: 100% (3/3), 444 bytes | 444.00 KiB/s, done.
Total 3 (delta 0), reused 0 (delta 0), pack-reused 0
To github.com:stevelinberg/distill-blog.git
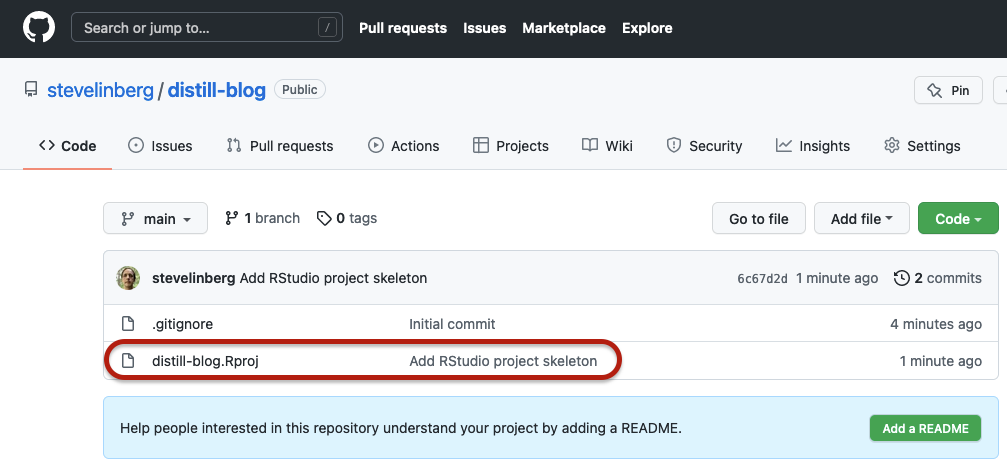
54aae63..6c67d2d main -> main After git push uploads the changes back to the GitHub repository, now if we flip back to GitHub and refresh the page, we’ll see that the project file has been added:
At this point, we have an empty RStudio project committed to a GitHub repository, but we don’t yet actually have any content. Now it’s time to create the Distill blog skeleton and add it to the repository.
Add the Distill skeleton to the repository
We will now manually (sort of) create the Distill skeleton. Although we could have created a new project of a Distill blog from the RStudio Create New Project wizard, it wouldn’t have had the GitHub repository, and we would have needed to add that and do the github setup separately. Six of one, half-dozen of the other, but instead we created the GitHub repository first instead, and we’ll add in Distill ourselves now. The end result should be the same.
(Note: these commands are entered in the RStudio Console, which looks a lot like the Terminal, but speaks a different language. They’re both areas where you type commands, but the difference is that the terminal is a shell that passes commands to the operating system, for doing things like creating directories, copying or deleting files, or issuing git commands, and the Console is an R-language construct that processes R commands. If you type an R command in the Terminal, or a shell command in the Console, they will both be confused and spit out an error message, but it won’t do any damage beyond that. A glance at the tab titles will quickly orient you.)
In the console, install the distill library if you haven’t yet (reinstalling it won’t do any harm):
> install.packages("distill")
trying URL 'https://cran.rstudio.com/bin/macosx/contrib/4.1/distill_1.3.tgz'
Content type 'application/x-gzip' length 454710 bytes (444 KB)
==================================================
downloaded 444 KB


The downloaded binary packages are in
    /var/folders/jw/rmjpk2xj7z7_8txfqrjz0jhr0000gn/T//RtmpjDcuEY/downloaded_packages
Then load the library, which you should also do as your first step (after opening the project) any time you work on it in the future:
> library(distill)With the distill library loaded, we’re ready to create the site. One important point is that we’re going to create the site in the root of our project, rather than inside a subdirectory. There’s no need to bury it one level down, since it won’t be a subcomponent of another project. The first argument in the command below, ".", means to work in the current directory, which is set by default as the directory containing the distill-blog.Rproj file. The argument is the blog title (which can be changed later if needed, but if you can avoid needing to do that it saves a few braincells), and the final argument causes it to be built with support for GitHub Pages, which is where our blog will ultimately end up.
Here’s the command I ran for this blog:
> create_blog(".", "Steve Linberg", gh_pages = TRUE)This takes a few seconds to run and creates a lot of new files. I like to go ahead and commit the project at this point as well, giving us a rollback point where we can wipe out changes we made and start over with a clean install if we get in trouble down the road. Switch back to the terminal, add all files in the directory, commit and push:
git add .
git commit -m "Install Distill skeleton"
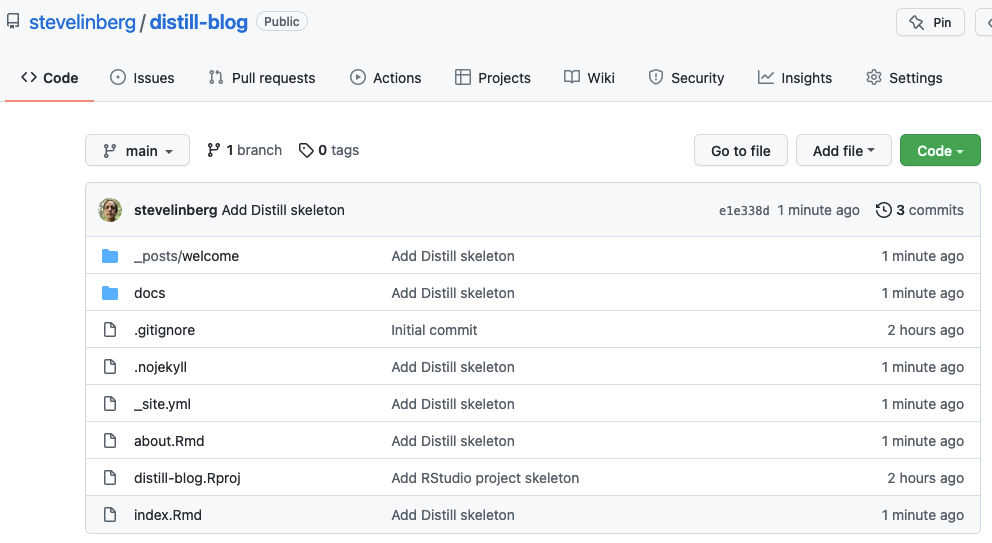
git pushIf we pop back over to GitHub and reload the repository view, we’ll see a lot of new files added:
Build the site
Before we do any further customizing, we can build the site and get it deploying on GitHub Pages. At this point, there’s nothing to see because the site hasn’t been built yet; doing the first build will construct the first blog post and the basic site skeleton.
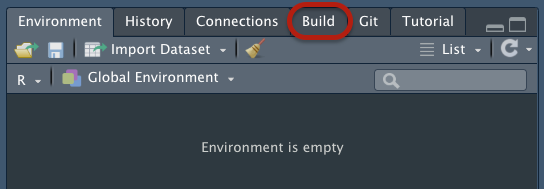
When you create the Distill site in this way, RStudio doesn’t yet know that there is one, and so the Build tab may be missing in the Environment pane:
If so, quit RStudio and re-open the project file, and it will appear:
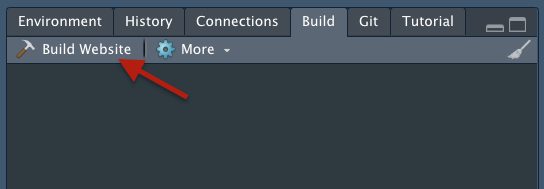
Click the Build tab and then “Build Website”:
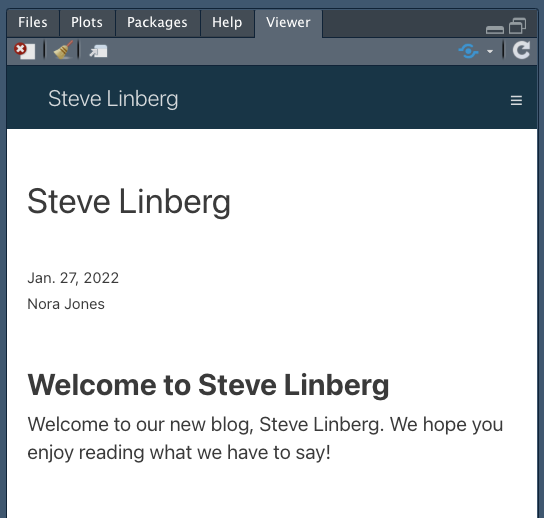
It will grind for a few moments and do the first build, and present you with a glorious preview of your new blog in the Viewer panel:
Let’s commit this stage too, since a few new files were just created. Switch to the Terminal tab (ctrl + backtick) and issue these git commands:
git add .
git commit -m "First build of site skeleton"
git push
Breathtaking in its awesomeness, we are now ready to share it with the world!
OK, you might prefer to do some work on it before you unveil it, and that’s fine. When you’re ready, continue below. (Read the RStudio page Creating a Blog to learn the details of how Distill sites work, and how to add and customize content; like anything worth learning, it takes a bit of time, but the payoff will be your mighty blog powers.) In this case, we’re going to go ahead and pretend we’re done and test the deployment to make sure it all works.
Configuring GitHub Pages
Next, we need to go back to GitHub and get GitHub Pages working, so we can publish our site.
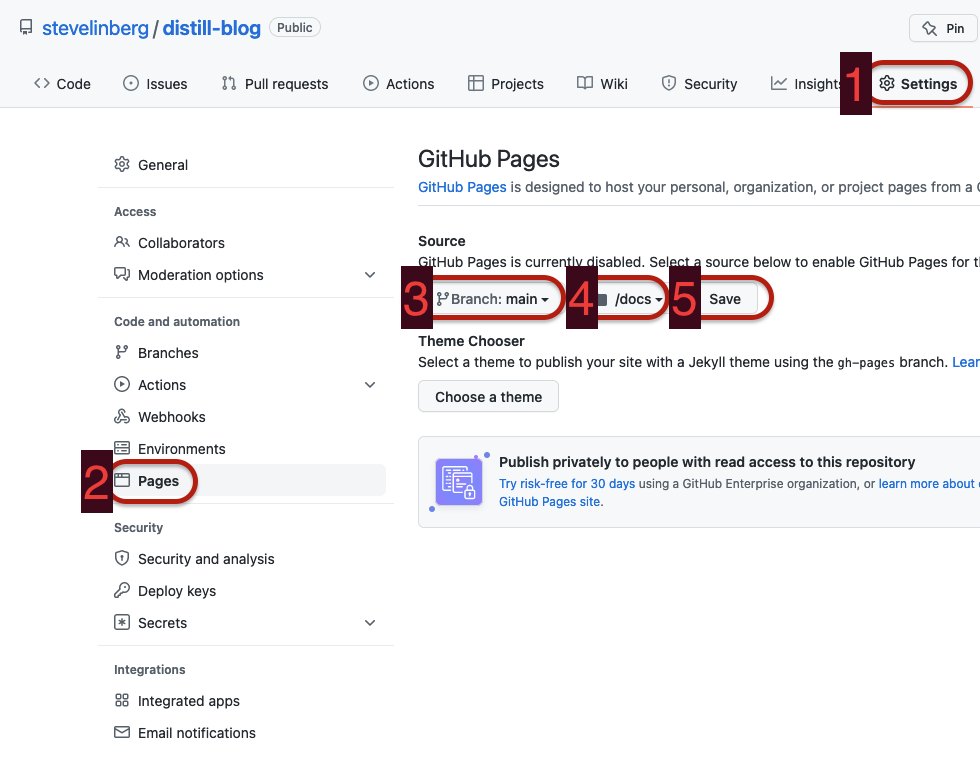
From your GutHub project page, as shown below:
- Click “Settings”
- On the left, click “Pages”
- Under “Source”, set the branch to “main”
- Set the folder to “/docs”
- Click “Save”.
(Note: ignore the “Choose a theme” button; it doesn’t apply to Distill projects.)
GitHub will show a success message (hopefully):
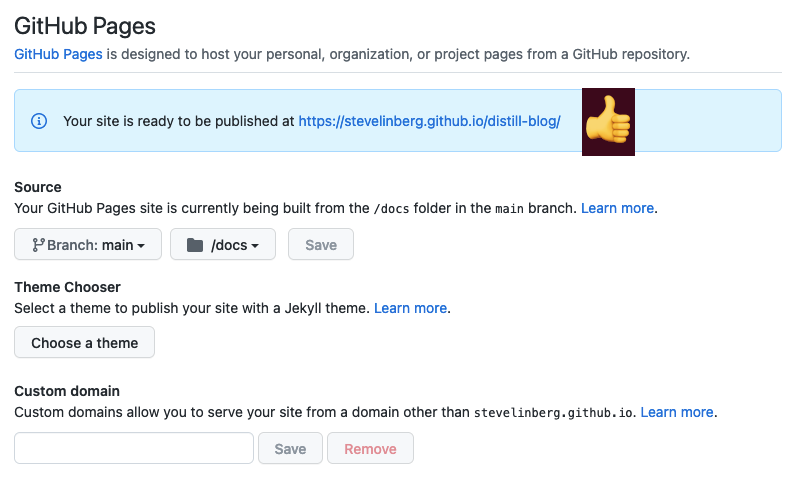
Note the “Custom domain” section at the bottom; we’ll return to that if/when we want to move the site to a custom domain. As it is, GitHub generates a URL for the site based on your GitHub username and the repo name. In this case, the address is https://stevelinberg.github.io/distill-blog/. Click the link, and you should see your site:
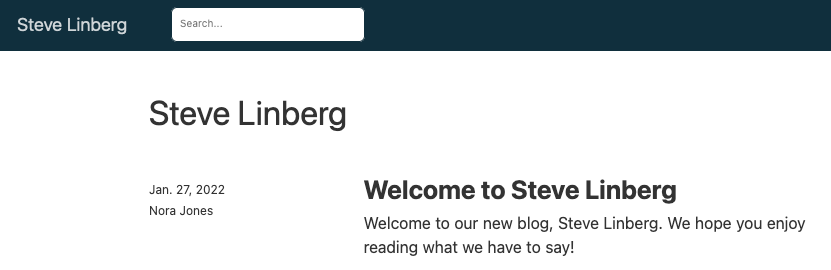
This means it’s live!
You could just go from here, if you’re content with the URL GitHub chose for you. Your basic workflow will be:
- Work on content in RStudio
- Commit changes with git as you go
- Build the site when you’re ready (or as often as you like)
- Push the changes to GitHub, which publishes them to your site.
If you want to brand a little more strongly and put the site on your own domain, continue with “Using a Custom Domain”, the next article in this series, coming soon.
Reuse
Citation
@online{linberg2022,
  author = {Steve Linberg},
  title = {Distill and {Github} {Pages} {Setup}},
  date = {2022-01-29},
  url = {https://slinberg.net/posts/2022-01-29_distill-and-github-pages-setup},
  langid = {en}
}